
RVIZ 기반 오도메트리 활용
odometry
오도미터(odometry): 차량이나 로봇이 주행하며 이동한 거리를 측정하는 기기 오도메트리(odomerty): 오도미터 등의 기기의 측정값으로 움직이는 사물의 위치를 측정하는 방법
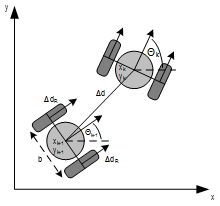
자동차의 이동거리는 바퀴의 회전수로 계산한다.
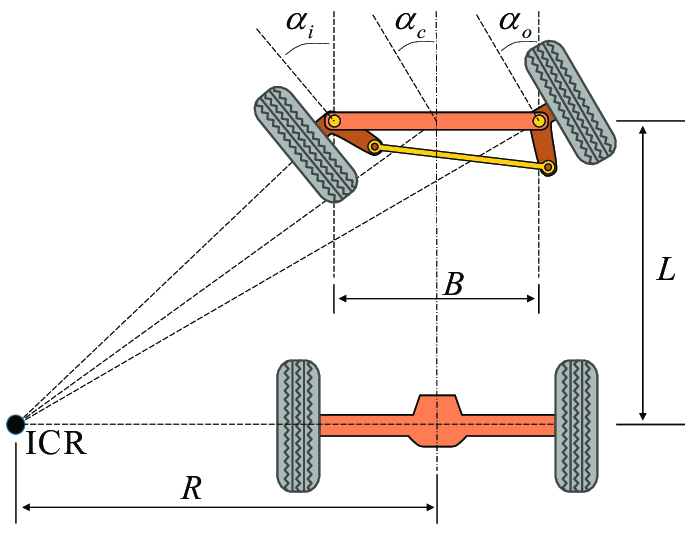
핸들을 꺽을 때 앞 바퀴 두개가 서로 다르다. 이유는 원을 그렸다고 생각했을 때 안쪽 바퀴는 바깥 바퀴보다 꺽여야 할 각도가 더 많이 꺽여야 한다. 계산하는 방법은 뒷바퀴를 기준으로 연장선을 긋고, 앞바퀴 두개의 각각 연장선이 동심원에서 만나야 한다.
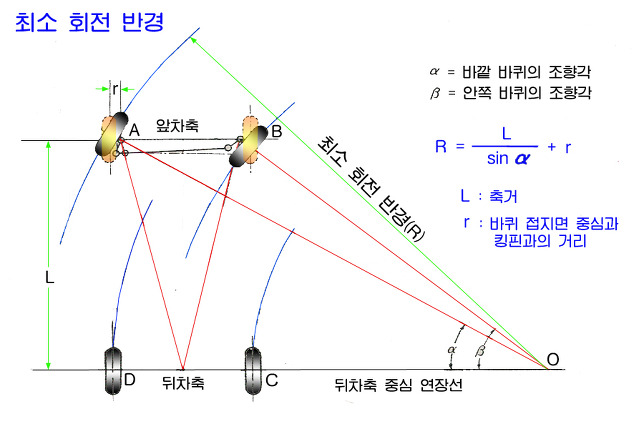
이를 간단하게 구하는 방법을 정의한 것이 Ackermann Steering이다.
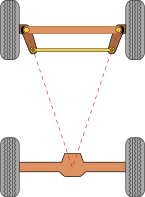
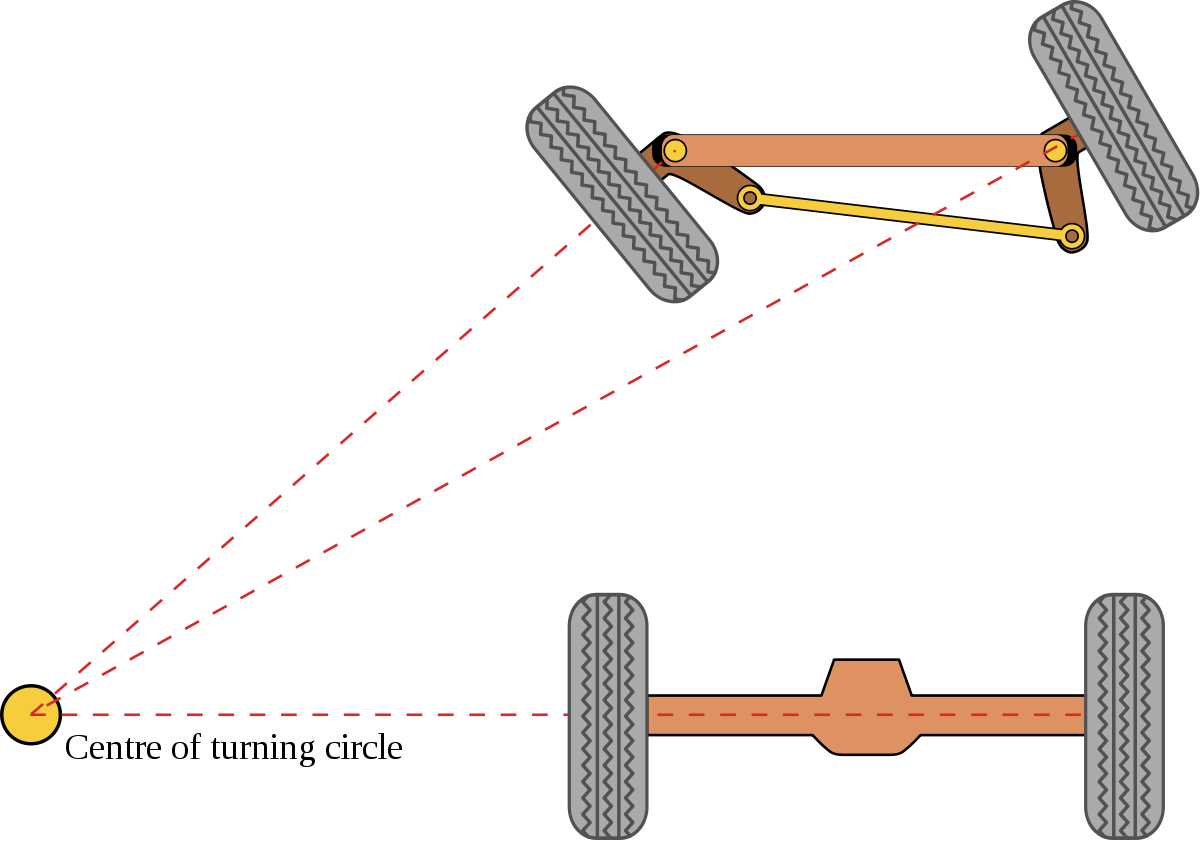
스티어링을 하나 만들어서 그 각도는 뒷바퀴의 중심에만 가도록 만들게 되면 두 개의 바퀴는 항상 동심원을 가진다는 것이다. 그러나 두개의 각도를 각각 구하는 것은 복잡하기 때문에 두 바퀴의 중간점에서의 각도로 정의한다.
자동차 위치 정보
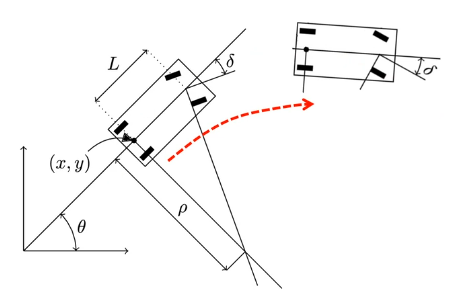
- 현재 위치 : (x,y) 좌표 + theta
- (x,y): 현재 뒷바퀴의 위치
- theta: 직교좌표계의 x축과 차량의 수직선이 이루는 각도
- 이동 속도 : 선속도 v + 각속도 w
- 조향각 델타
- 델타: 앞바퀴와 도착하고자 하는 뒷바퀴의 위치와, 현재 차량의 수직선이 이루는 각도
odometry 토픽
/odom이라는 토픽을 발행하는 예제 코드가 있다. 파이썬 코드 : ros_odometry_publisher_example.py https://gist.github.com/atotto/f2754f75bedb6ea56e3e0264ec405dcf
파일이름은 각자 변경가능하다.
아래 파일을 ex_urdf 파일에 추가한다.
1
2
3
4
5
6
7
8
9
10
11
12
13
14
15
16
17
18
19
20
21
22
23
24
25
26
27
28
29
30
31
32
33
34
35
36
37
38
39
40
41
42
43
44
45
46
47
48
49
50
51
52
53
54
55
56
57
58
59
60
61
62
63
64
65
66
67
68
69
70
71
72
73
74
75
#!/usr/bin/env python
# name change ros_odometry_publisher_example.py -> odom_publisher_ex.py
import math
from math import sin, cos, pi
import rospy
import tf
from nav_msgs.msg import Odometry
from geometry_msgs.msg import Point, Pose, Quaternion, Twist, Vector3
rospy.init_node('odometry_publisher') # odomety_publisher 노드 생성
odom_pub = rospy.Publisher("odom", Odometry, queue_size=50) # odom 토픽 발행 준비
odom_broadcaster = tf.TransformBroadcaster()
# 초기 위치
x = 0.0
y = 0.0
th = 0.0
# 초기 속도 x축 속도는 10cm/s, y축 속도는 -10cm/s, 주행 방향은 0.1라디안(5.7도)
vx = 0.1
vy = -0.1
vth = 0.1
# 시간 정보 계산용 변수
current_time = rospy.Time.now()
last_time = rospy.Time.now()
r = rospy.Rate(1.0) # 1초에 한번씩 돌기
while not rospy.is_shutdown():
current_time = rospy.Time.now()
# compute odometry in a typical way given the velocities of the robot
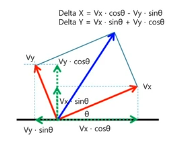
# 그림1 참고
dt = (current_time - last_time).to_sec() # 델타 시간
delta_x = (vx * cos(th) - vy * sin(th)) * dt # 속도 x 시간 = 거리
delta_y = (vx * sin(th) + vy * cos(th)) * dt
delta_th = vth * dt
x += delta_x
y += delta_y
th += delta_th
# since all odometry is 6DOF we'll need a quaternion created from yaw
# 오일러 좌표계 회전을 쿼터니언 값으로 계산함
odom_quat = tf.transformations.quaternion_from_euler(0, 0, th) # 아래 좌표계 회전 설명 참고
# first, we'll publish the transform over tf
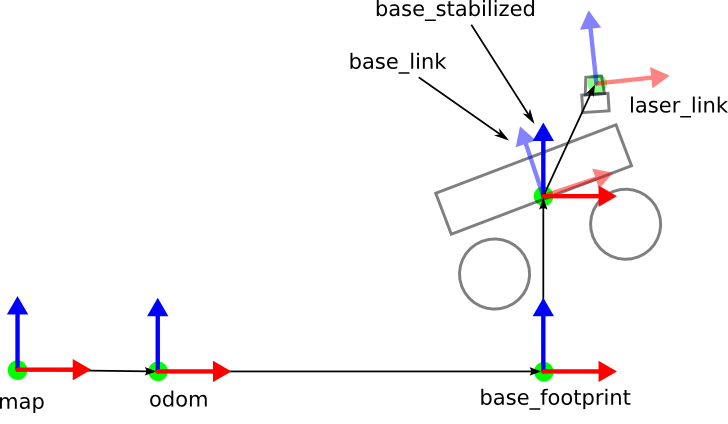
odom_broadcaster.sendTransform(
(x, y, 0.), # 위치 정보애 대한 발행 준비
odom_quat,
current_time,
"base_link", # odom과 base_link를 연결하는 코드
"odom"
)
# next, we'll publish the odometry message over ROS
odom = Odometry()
odom.header.stamp = current_time
odom.header.frame_id = "odom"
# set the position
odom.pose.pose = Pose(Point(x, y, 0.), Quaternion(*odom_quat))
# set the velocity
odom.child_frame_id = "base_link"
odom.twist.twist = Twist(Vector3(vx, vy, 0), Vector3(0, 0, vth))
# publish the message
odom_pub.publish(odom)
last_time = current_time
r.sleep()
이 코드가 하는 일
- odometry_publisher노드를 생성
- 거기서 /odom 토픽을 발행
- 1초에 1번씩 발행
이동 속도
이동 속도는 Vx, Vy의 두 벡터의 합성이다.
좌표계 회전
좌표축이 회전하는 것이 3가지가 있다. x축 기준으로 회전하는 것을 roll, y축 기준으로 회전하는 것을 pitch, z축 기준으로 회전하는 것을 yaw이라 한다.
이와 같이 나타내는 것을 오일러 방식이라 한다. 그러나 여기서난 쿼터니언 방식을 사용하는데, 이유는 계산하기 쉽기 때문이다.
실행
1
2
3
4
5
$ roscore
$ rosrun ex_urdf odom_publisher_ex.py
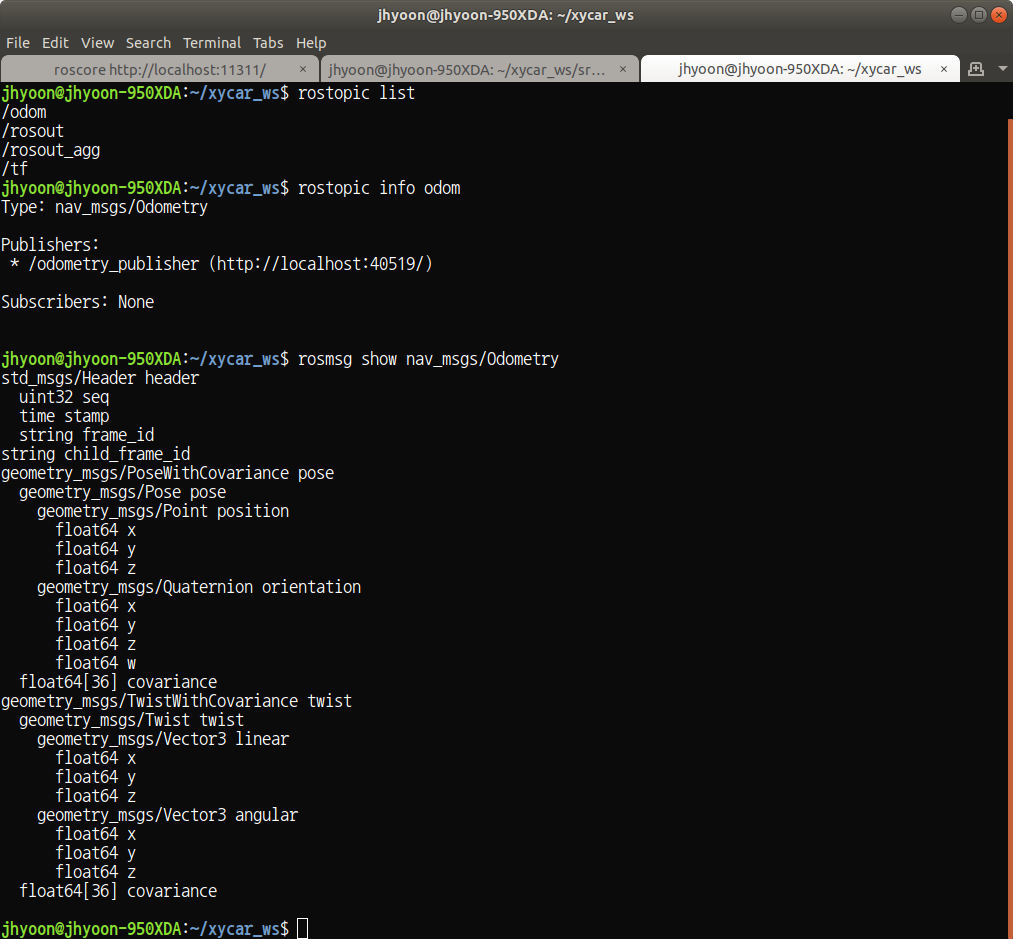
$ rostopic list
$ rostopic info odom
$ rqt_graph
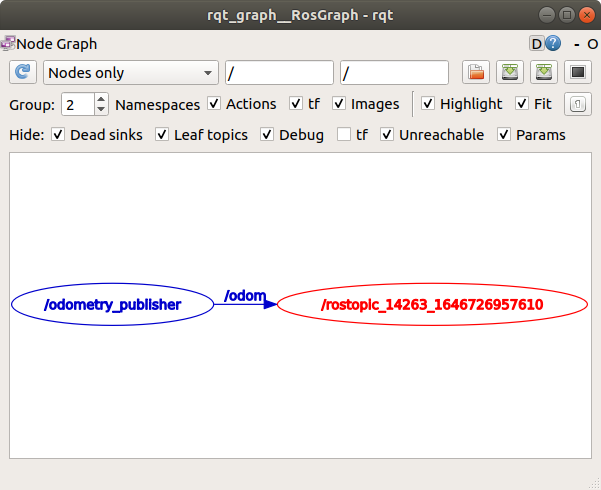
- odomety 토픽 : /odom
- odom 메시지 타입 : nav_msgs/Odometry
1
2
$ rosmsg show nav_msgs/Odometry
$ rostopic echo odom
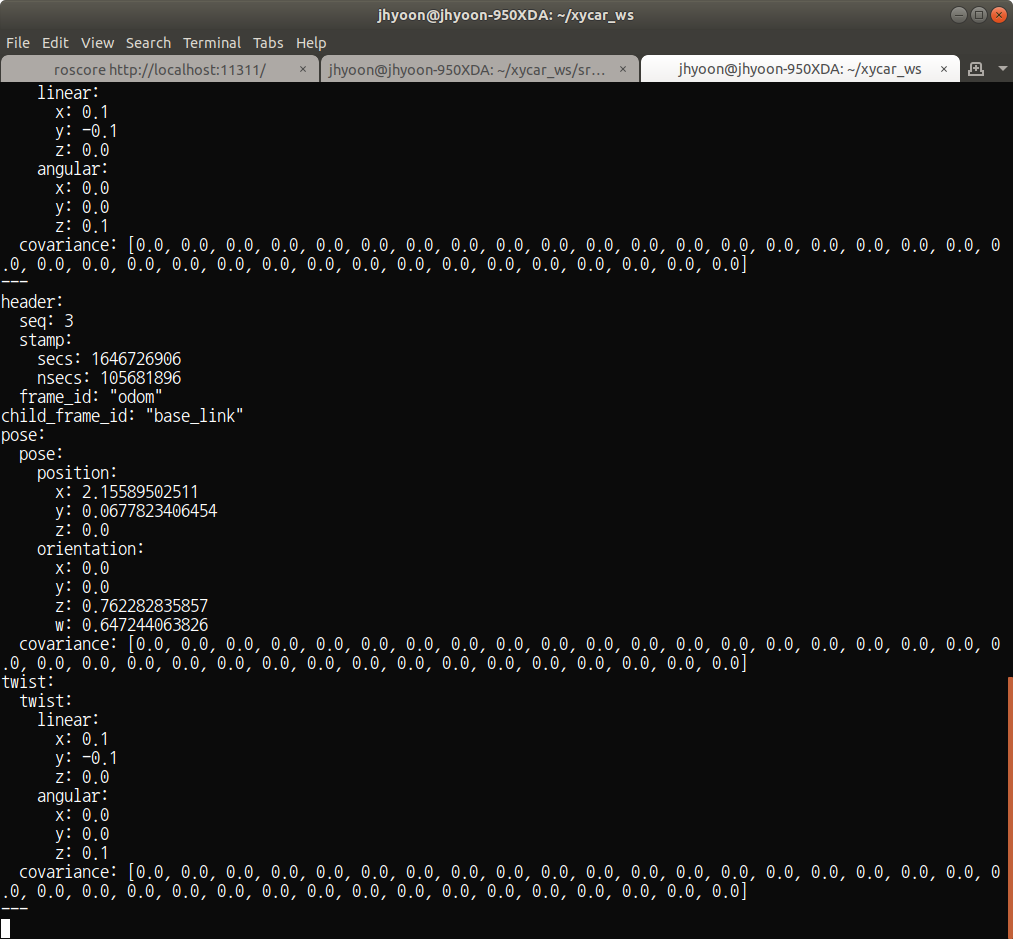
position: 뒷바퀴 기준 점 Quaternion orientation: 롤 요키치를 가상의 좌표계로 나타낸 값 vector linear: 선속도 vector angular: 각속도
RVIZ 가상공간에서 물체 이동시키기
기존의 odom_publisher_ex.py가 있는 패키지를 이용한다. launch 파일도 생성한다.
1
2
3
4
5
6
7
8
<!-- odom_pub.launch -->
<launch>
    <arg name="model" />
    ...
    <!-- add python file -->
    <node name="odom_publisher" pkg="ex_urdf" type="odom_publisher_ex.py" />

</launch>
1
$ roslaunch ex_urdf odom_pub.launch
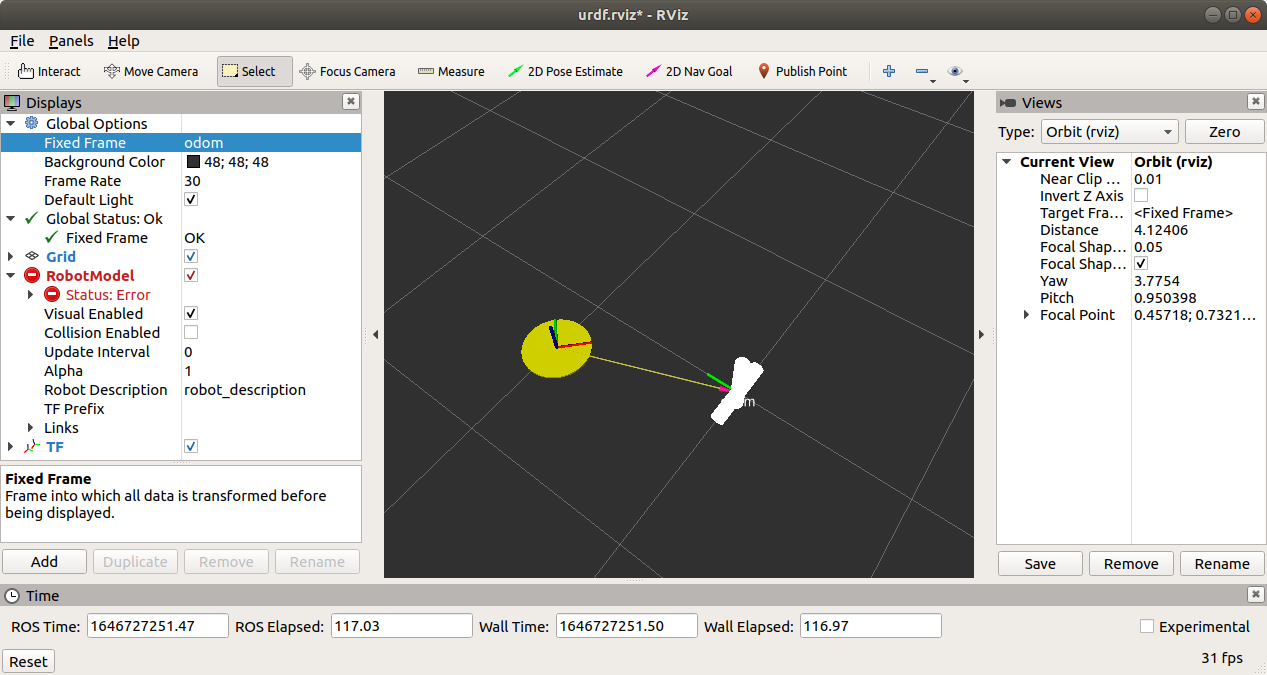

/tf는 어떤 물체의 자세나 이것저것 계산해서 rviz에 쏘는 시각화 노드이다.
그래서 직접 RVIZ에서 주행을 시키기 위한 과정으로는
- 8자 주행 프로그램이
/motor 토픽인 모터 제어 메시지를 보낸다. - 변환 프로그램이 받아서 변환한 후
/joint_states토픽으로 만들어 발행 - 토픽을 오도메트리 프로그램이 받아서 변환해서
/odom토픽으로 만들어 발행
