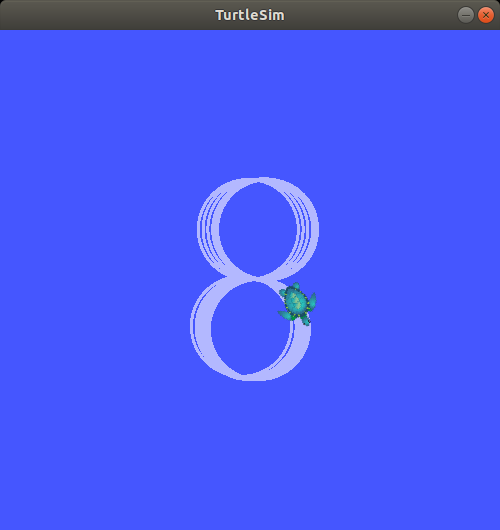
ROS turtlesim 8자 주행
1
2
3
4
5
6
7
8
9
10
11
12
13
14
15
16
17
18
19
20
21
22
23
24
25
26
27
28
# pub8.py

#!/usr/bin/env python

import rospy
from geometry_msgs.msg import Twist

turn = 0
rospy.init_node('my_node', anonymous=True)
pub = rospy.Publisher('/turtle1/cmd_vel',Twist,queue_size=10)

msg = Twist()
msg.linear.x = 2.0
msg.linear.y = 0.0
msg.linear.z = 0.0
msg.angular.x = 0.0
msg.angular.y = 0.0
msg.angular.z = 1.8

rate = rospy.Rate(1)

while not rospy.is_shutdown():
	pub.publish(msg)
	rate.sleep()
	turn = turn + 1.8 # 얼마나 이동했는지 보기 위해서
	if turn >= 12:
		msg.angular.z *= -1
		turn = 0
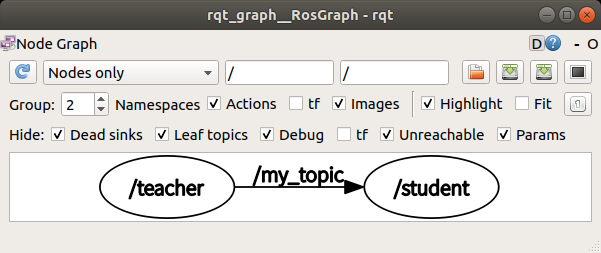
msg 패키지
- 전체 구성
노드1 ( teacher ) ——토픽 전송 ( my_topic )——> 노드2 ( student )
1
2
3
4
5
6
7
8
9
10
11
xycar_ws
	⊢ src
		⊢ my_pkg1
		∟ msg_send
			⊢ launch
				∟ m_send.launch
			∟ src
				⊢ teacher.py
				∟ student.py
	⊢ build
	∟ devel
1.먼저 패키지 폴더 생성
1
2
3
4
$ catkin_create_pkg msg_send std_msgs rospy
$ cd msg_send
$ mkdir launch
$ cm
2.파일 내용
teacher.py: publisher → 토픽에 call me please를 담아 전송
student.py: subscriber → 토픽 받아서 내용을 꺼내서 화면에 출력
주고 받는 토픽 이름은 my_topic
- teacher.py
1
2
3
4
5
6
7
8
9
10
11
12
13
14
#!/usr/bin/env python

import rospy
from std_msgs.msg import String

rospy.init_node('teacher')

pub = rospy.Publisher('my_topic', String)

rate = rospy.Rate(2)

while not rospy.is_shutdown():
		pub.publish('call me please')
		rate.sleep()
- student.py
1
2
3
4
5
6
7
8
9
10
11
12
13
#!/usr/bin/env python

import rospy
from std_msgs.msg import String

def callback(msg):
	print msg.data

rospy.init_node('student')

sub = rospy.Subscriber('my_topic', String, Callback)

rospy.spin()
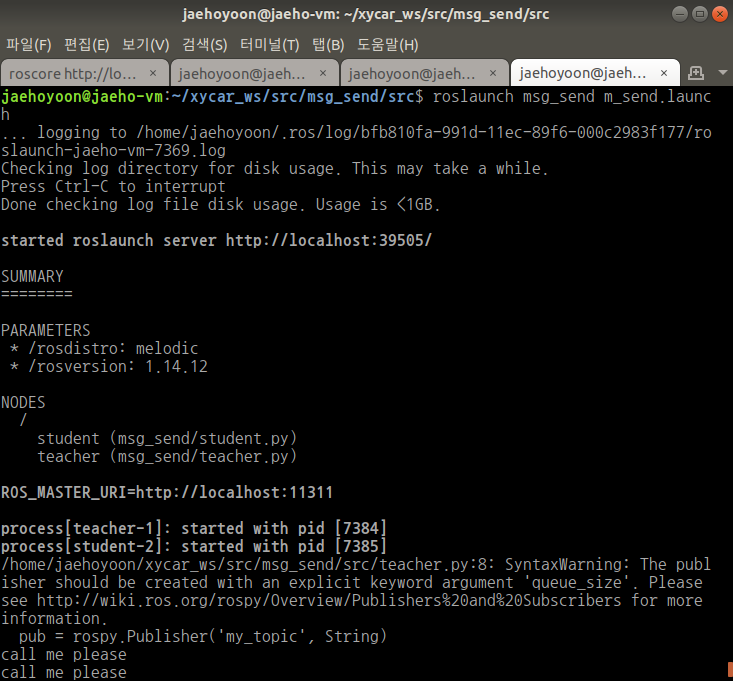
- m_send.launch
1
$ gedit m_send.launch
1
2
3
4
<launch>
	<node pkg="msg_send" type="teacher.py" name="teacher"/>
	<node pkg="msg_send" type="student.py" name="student" output="screen"/>
</launch>
코드 분석
teacher.py
1.인터프리터 선언
파일의 첫줄에 #!로 시작되는 라인을 shebang 라인이라 한다. 스크립트 파일의 첫 줄에 사용되고, 해당 파일의 실행에 어던 인터프리터를 사용할지 지정한다.
python2.6 ,python3 등으로 파이썬 버전을 구분해줄 수도 있다. 이 shebang라인을 선언해줄 경우 $./teacher.py로 실행할 수 있다.
1
#!/usr/bin/env python
2.임포트
남이 만든 소프트웨어나 라이브러리를 가져와 사용할 때 사용한다. 이 경우 rospy라는 라이브러리를 import하여 사용하겠다는 것, 그리고 std_msgs.msg에서 string이라는 라이브러리르 사용하겠다는 것이다.
1
2
import rospy
from std_msgs.msg import String
3.’teacher’ 이름의 노드 생성
해당 노드를 초기화하고 노드의 이름을 정하는 코드다. 노드를 관리하고 통합하는 ros 프레임워크를 python으로 만든 것이 rospy이고, 이를 통해 노드를 초기화한다.
1
rospy.init_node('teacher')
def init_node를 자세히 보면 엄청 많은 인자들이 존재한다.
- name: 노드의 이름으로 타입은 string
- argv: 사용자가 지정한 argument를 넘겨받을 때 사용한다. 타입은 list<string> 이다.
- anonymous: 노드의 이름을 자동으로 생성한다는 것으로 보통은 name뒤에 임의의 숫자를 붙인다. 같은 노드로 여러 instance를 사용할 때 사용한다.
- log_level: 타입은 int, rospy.DEBUG, rospy.INFO,rospy.ERROR 등을 사용할 수 있다.
- disable_rostime: 내부적인 테스트시에만 사용
- disable_rosout: 내부적인 테스트시에만 사용
- disable_signal: true라면 rospy는 사용자의 signal handler를 등록하지 않는다. 사용자가 main thread로부터 init_node를 콜하지 않을 때나 사용자가 자신만의 signal handling을 설정해야하는 환경에서 rospy를 사용할 때 사용한다.
- xmlrpc_port: client XMLRPC node에 대한 포트번호
- tcpros_port: TCPROS는 이 포트를 통해 통신하게 된다.
4.퍼블리셔 선언
my tipic이라는 이름의 토픽을 발행하는 노드라는 것을 말해주는 코드다. 그 뒤에는 토픽의 타입을 말해주는 것으로 지금은 string이다. 메시지 타입으로도 넣을 수 있다.
1
pub = rospy.Publisher('my_topic', String) # 퍼블리셔를 생성 토픽이름이 my topic이고 메시지 타입은 string인 퍼블리셔
5.반복
1초에 2번 loop를 반복할 수 있도록 rate라는 객체를 생성하는 것이다. 1초안에 2번이므로 약 0.5초에 1번씩 돈다. 0.5초 안에 작업을 마친다면 나머지 시간은 휴식한다.
1
rate = rospy.Rate(2) # 1초에 2번 루프를 돈다는 것
6.루프 시작
shutdown 즉, ros시스템이 끝나지 않을 때동안 계속 진행하라는 것이다.
1
while not rospy.is_shutdown():
7.퍼블리셔
토픽의 내용을 발행한다.
1
    pub.publish('call me please') # call me please라는 메시지를 전달해라
8.sleep
작업을 마친 다음 남는 시간은 멈춰있으라는 말이다.
1
    rate.sleep()
student.py
1.인터프리터 선언
1
#!/usr/bin/env python
2.임포트
1
2
import rospy
from std_msgs.msg import String
3.콜백함수 선언
callback함수 선언하는 코드로, 이는 토픽이 도착했을 때마다 실행되는 함수이다. 이 함수는 msg.data 를 화면에 출력한다. 토픽을 보낼 때 string 타입으로 보냈다. 이를 자세히 보면 data라는 곳에 담아져 날아오기 때문에 이를 불러오기 위해서는 msg가 아니라 data로 불러와야 한다. 만약 다른 타입에서 array라는 공간에 담겨져 온다면 msg.array라고 해야 한다.
1
2
def Callback(msg):
	print msg.data
4.초기화
1
rospy.init_node('student') # student이름의 node 생성
5.서브스크라이버 선언
subscriber 노드인데 받을 토픽 이름이 my topic이고 string 메시지 타입을 받을 것이다. 이 토픽이 도착하면 callback 함수를 불러달라는 코드다.
1
sub = rospy.Subscriber('my_topic', String, Callback)
6.무한 반복
ros 시스템이 끝날 때까지 계속 반복
1
rospy.spin()
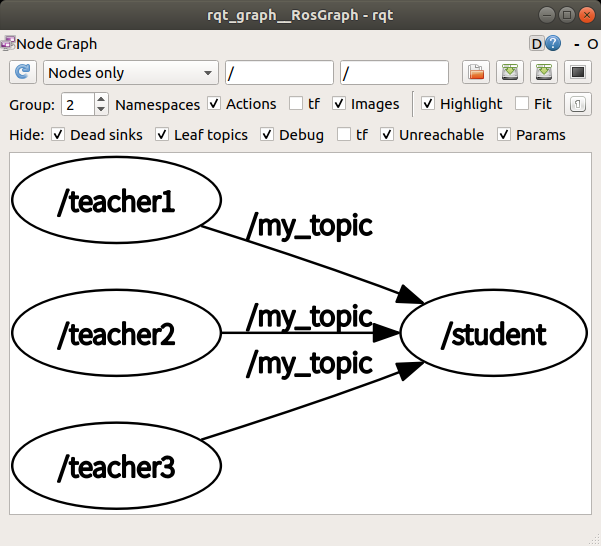
1:N, N:1, N:N통신
통신 구성
- 1:N 통신 e.g. 카메라 → 인공지능 , 영상처리, 하드웨어, 화면
- N:1 통신 e.g. 머신러닝, 알고리즘, 인지판단 → 모터
- N:N 통신
앞서 사용한 토픽에서 string이 아닌 int32를 사용
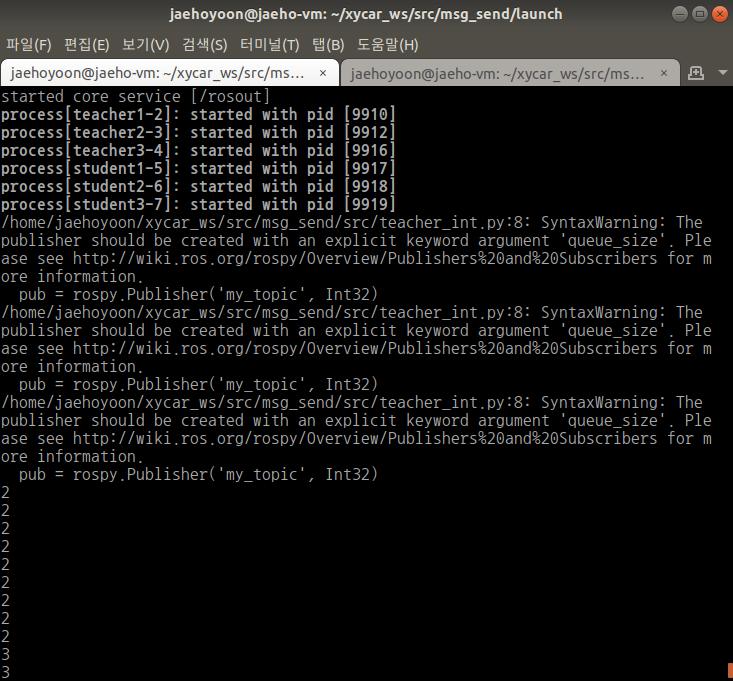
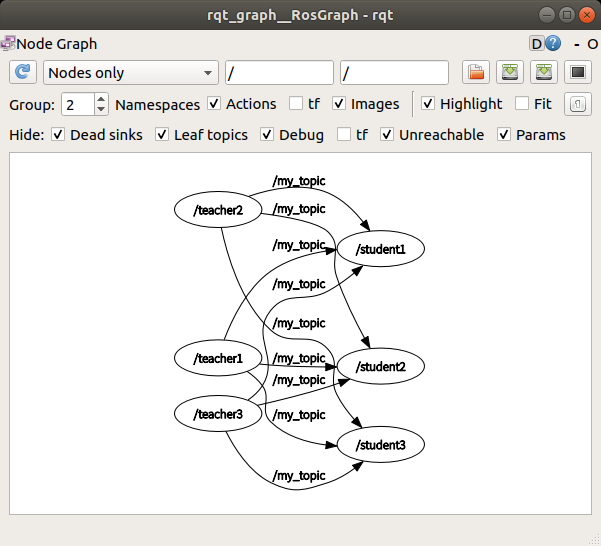
N:N통신
- teacher_int.py
1
2
3
4
5
6
7
8
9
10
11
12
13
14
15
16
#!/usr/bin/env python

import rospy
from std_msgs.msg import Int32

rospy.init_node('teacher')

pub = rospy.Publisher('my_topic', Int32)

rate = rospy.Rate(2)
count = 1

while not rospy.is_shutdown():
    pub.publish(count)
    count = count + 1
    rate.sleep()
- student_int.py
1
2
3
4
5
6
7
8
9
10
11
#!/usr/bin/env python

import rospy
from std_msgs.msg import Int32

def callback(msg):
	print msg.data

rospy.init_node('student')
sub = rospy.Subscriber('my_topic', Int32, callback)
rospy.spin()
노드를 여러 개 띄울 때 하나의 코드로 여러 개의 노드를 연결하려면 각 도드의 이름을 달리해야 한다. 그러나 노드의 init함수에서 anonymous=True 값을 넣어주면 노드 이름이 자동 설정된다.
1
2
3
$ rosrun msg_send teacher_int-1.py
$ rosrun msg_send teacher_int-2.py
$ rosrun msg_send teacher_int-3.py
위의 방법은 비효율적이다. 따라서 node 설정시 anonymous=True로 설정한 후 실행하면 각자 다른 이름이 설정된다. 이 때 중요한 것은 subscriber 쪽에도 anonymous를 설정해야 동일하게 작동된다.
1
2
3
4
5
6
7
8
9
10
11
12
13
14
student_int.py
$ rospy.init_node('student',anonymous=True)

teacher_int.py
$ rospy.init_node('teacher',anonymous=True)

------

$ rosrun msg_send teacher_int1.py
$ rosrun msg_send student_int1.py
$ rosrun msg_send teacher_int2.py
$ rosrun msg_send student_int2.py
$ rosrun msg_send teacher_int3.py
$ rosrun msg_send student_int3.py
1
2
3
4
5
6
7
8
9
<!-- m_send_nn.launch -->
<launch>
	<node pkg="msg_send" type="teacher_int.py" name="teacher1"/>
	<node pkg="msg_send" type="teacher_int.py" name="teacher2"/>
	<node pkg="msg_send" type="teacher_int.py" name="teacher3"/>
	<node pkg="msg_send" type="student_int.py" name="student1" output="screen"/>
	<node pkg="msg_send" type="student_int.py" name="student2" output="screen"/>
	<node pkg="msg_send" type="student_int.py" name="student3" output="screen"/>
</launch>
이로써 소스파일은 건들이지 않고 이름만 바꿔줌으로써 N:N 통신이 가능해진다.
1:N 통신
m_send_nn.launch파일을 살짝 바꿔주면 된다.
1
2
3
4
5
6
7
<!-- m_send_1n.launch -->
<launch>
	<node pkg="msg_send" type="teacher_int.py" name="teacher"/>
	<node pkg="msg_send" type="student_int.py" name="student1" output="screen"/>
	<node pkg="msg_send" type="student_int.py" name="student2" output="screen"/>
	<node pkg="msg_send" type="student_int.py" name="student3" output="screen"/>
</launch>


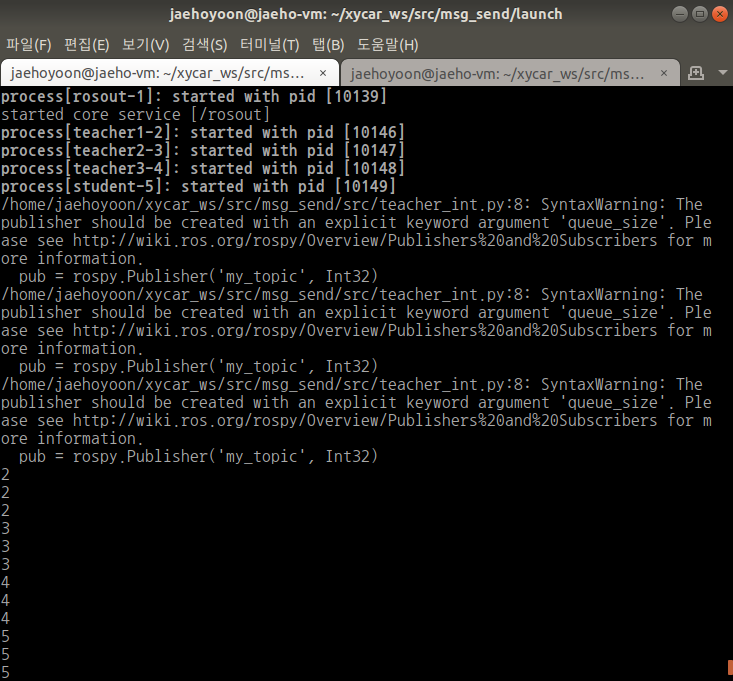
N:1 통신
m_send_nn.launch 파일을 수정
1
2
3
4
5
6
7
<!-- m_send_n1.launch -->
<launch>
	<node pkg="msg_send" type="teacher_int.py" name="teacher1"/>
	<node pkg="msg_send" type="teacher_int.py" name="teacher2"/>
	<node pkg="msg_send" type="teacher_int.py" name="teacher3"/>
	<node pkg="msg_send" type="student_int.py" name="student" output="screen"/>
</launch>
나만의 메시지 만들기
1
2
3
4
5
6
7
8
9
10
11
12
13
14
xycar_ws
	⊢ src
		∟ msg_send
			⊢ launch
				∟ m_send.launch
			⊢ msg
				∟ my_msg.msg
			⊢ src
				⊢ teacher.py
				∟ student.py
			⊢ CMakeLists.txt
			∟ package.xml
	⊢ build
	∟ devel
1
2
3
$ cd ~/xycar_ws/src/msg_send
$ mkdir msg && cd msg
$ gedit my_msg.msg
- my_msg.msg
1
2
3
4
5
6
string first_name
string last_name
int32 age
int32 score
string phone_number
int32 id_number
그 다음 package.xml 파일을 수정해야 한다. 다음 코드를 맨 아래에 추가한다.
1
2
3
4
5
6
  ...
 <exec_depend>std_msgs</exec_depend>

 <!-- 추가 -->
 <build_depend>message_generagtion</build_depend>
 <exec_depend>message_runtime</exec_depend>
또한, CMakeLists.txt도 수정해야 한다.
find_package(catkin REQUIRED COMPONENTS
  rospy
  std_msgs
  message_generation
)

## Generate messages in the 'msg' folder , 코멘트를 풀고 수정
add_message_files(
  FILES
  my_msg.msg
)

## Generate added messages and services with any dependencies listed here, 코멘트 풀기
generate_messages(
  DEPENDENCIES
  std_msgs
)

## 1줄 추가
catkin_package(
 CATKIN_DEPENDS message_runtime
)
- 실행 결과
1
2
3
4
5
6
7
$ rosmsg show msg_send/my_msg
string first_name
string last_name
int32 age
int32 score
string phone_number
int32 id_number
custom message 사용하여 코드 작성
참고 사이트: ros 공식 사이트
1
2
# from 패키지이름.msg import 메시지 파일 이름
from msg_send.msg import my_msg
다른 패키지의 custom msg도 사용할 수 있다.
- msg_sender.py
1
2
3
4
5
6
7
8
9
10
11
12
13
14
15
16
17
18
19
20
21
22
23
24
25
26
27
#!/usr/bin/env python
import rospy
# from 패키지이름.msg import 메시지 파일 이름
from msg_send.msg import my_msg # my_msg라는 파일을 쓸 것이다.
# msg_sender 노드 생성
rospy.init_node('msg_sender', anonymous=True)
# pub 노드, 토픽 이름은 msg_to_xycar 메시지 타입은 my_msg
pub = rospy.Publisher('msg_to_xycar', my_msg)
# 데이터 채우기
msg = my_msg()
msg.first_name = "JaeHo"
msg.last_name = "Yoon"
msg.id_number = "12345678"
msg.phone_number = "010-1234-5678"
# 1초에 1번 쉬기
rate = rospy.Rate(1)
while not rospy.is_shutdown():
# 메시지를 발행
pub.publish(msg)
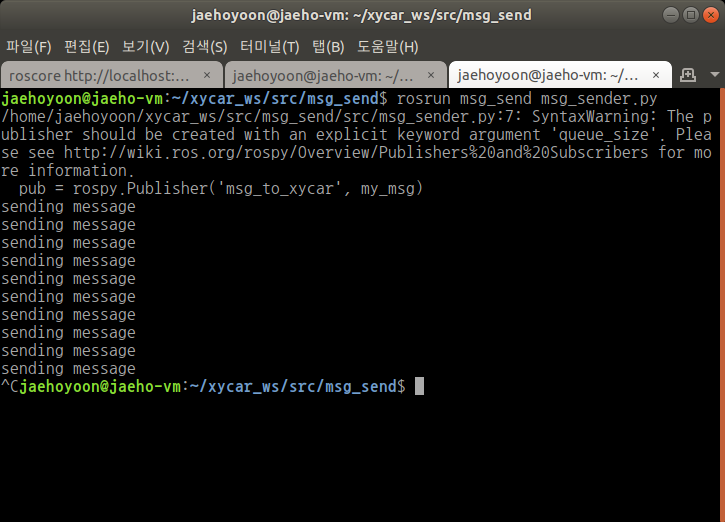
# 발행하면 sending message 출력
print("sending message")
rate.sleep()
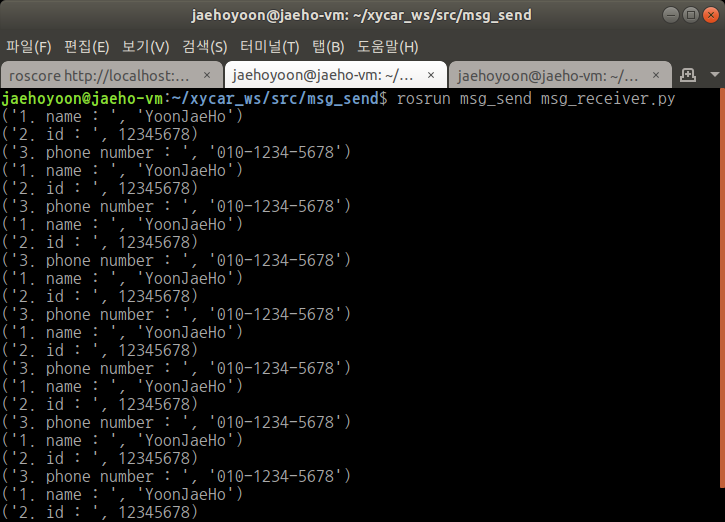
- msg_receiver.py
1
2
3
4
5
6
7
8
9
10
11
12
13
14
15
#!/usr/bin/env python

import rospy
from msg_send.msg import my_msg

def callback(msg):
	print("1. name : ", msg.last_name + msg.first_name)
	print("2. id : ", msg.id_number)
	print("3. phone number : ", msg.phone_number)

rospy.init_node("msg_receiver", anonymous=True)

sub = rospy.Subscriber('msg_to_xycar', my_msg, callback)

rospy.spin()
- 실행
1
2
3
4
$ cm
$ roscore
$ rosrun msg_send msg_receiver.py
$ rosrun msg_send msg_sender.py
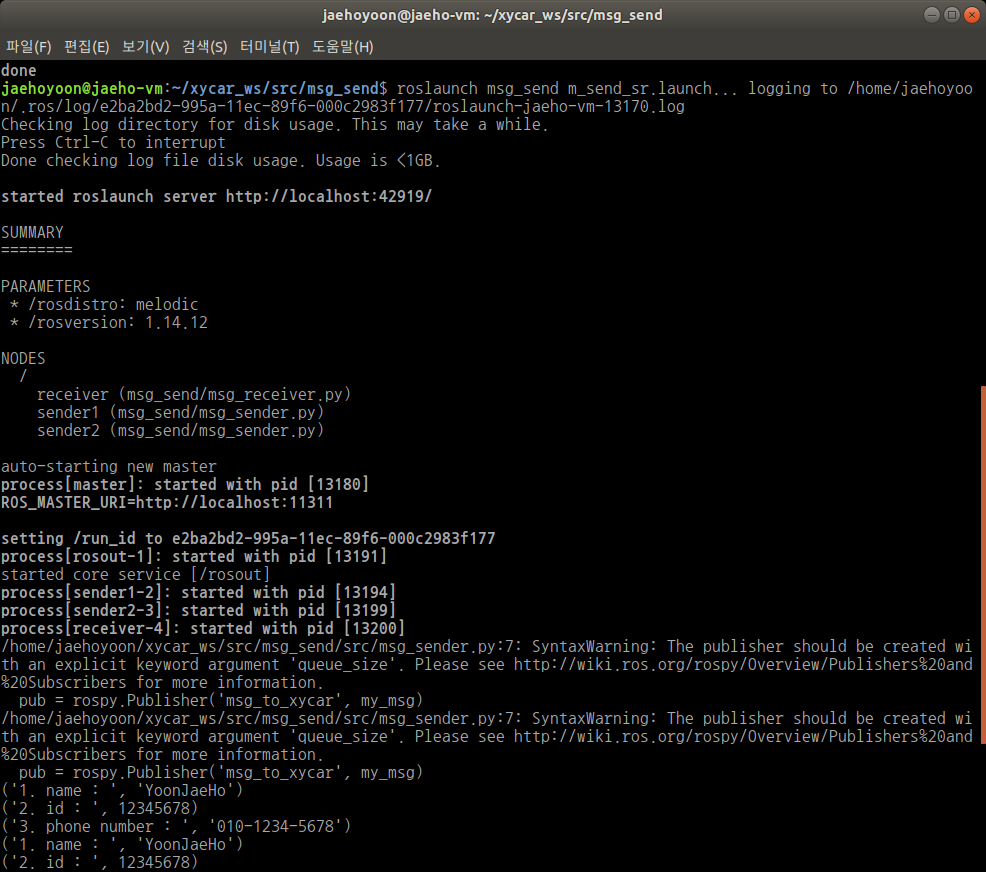
- launch 파일 만들어서 실행
1
2
3
4
5
6
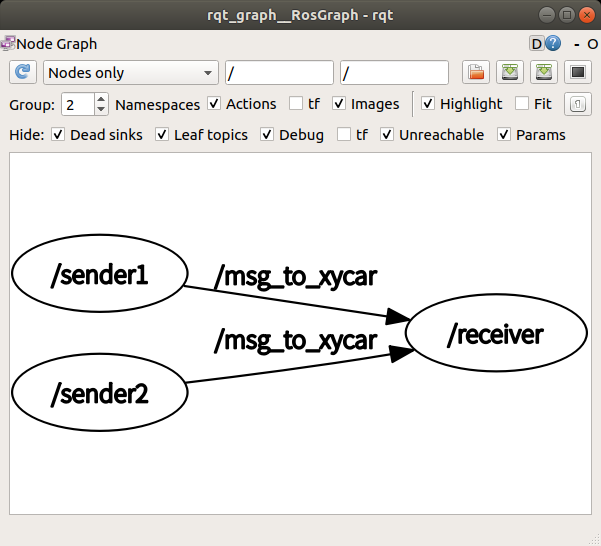
<!-- my_sender.launch -->
<launch>
<node pkg="msg_send" type="msg_sender.py" name="sender1" />
<node pkg="msg_send" type="msg_sender.py" name="sender2" />
<node pkg="msg_send" type="msg_receiver.py" name="receiver" output="screen" />
</launch>
1
$ roslaunch msg_send my_sender.launch